Today we’re going to take a look at guitar bends, something that you could classify as an “moderate to advanced guitar technique”. What are the bends? Simply, the guitar bend is designed to give what some guitarists simply refer to as the “voice”. Think about it this way: You can play the note but what happens when you play that same note and also put a twist on it? That twist is what we define as a change in the pitch.
Depending on your skill level, either guitar bends have become something that is simply second nature or rather a particular skill you’ve always wanted to master but afraid it could be too difficult. Truthfully, bends are not exactly extraordinary complicated but they will give you a lot of trouble in the early stages.
As I already mentioned, guitar bends is all about changing the pitch in the note. While this may sound relatively easily it does take some practice and focus to make it work right. Which is what we’re all after, right?
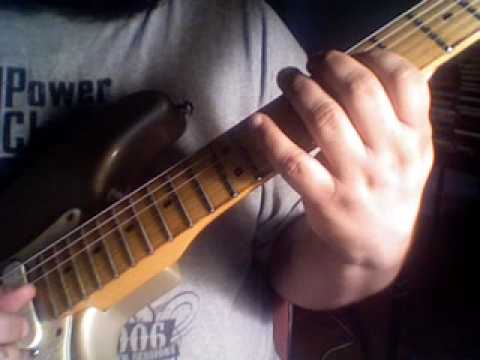
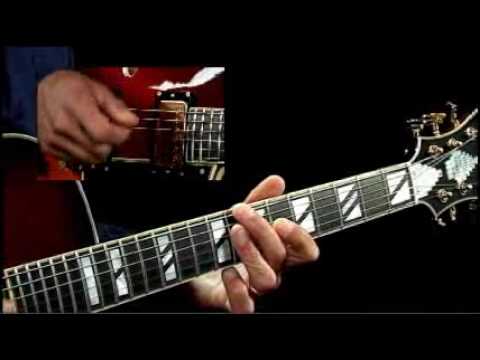
Guitar bends are executed by using not one, not two, but three fingers. This is accomplished by placing your third finger on the fret you are trying to bend while placing your first and second fingers on the frets behind it. Exert pressure with all three fingers and ah-la — you got a bend.
So, for example, you could fret the note on the eight fret, third string with your third finger. Then, you would place your second finger on the third string seventh fret and your first finger on the third string, sixth fret.
Got it?
Your ultimate goal is to bend the note up one semi-tone – or what guitarists refer to as a “half step” – and then return the note to its original pitch. You do this by picking the note you want to bend, pressing (in an upward motion or toward you) while still putting some pressure on the strings. A common mistake is to only want to bend the note with your primary finger (in this case, the third finger) while the other two remain still. However, a wise guitarist will use all three fingers. After you have accomplished the bend desired, return the note to its original pitch.
If the first time you practice a guitar bend the pitch does not seem to alter much, fret not. Guitar bends do take practice and you will not master them at first. Acoustic guitarists, beware, I hate to break the news but guitar bends are even a little tougher on acoustic.
Remember when you first started playing the guitar and your fingers ached for like two weeks? That’s how you have to approach the bends. You’re likely using finger muscles you’ve never used before and they will take time to develop. Hey, Hogan did not become the Hulk overnight either.
Patience truly is a virtue.
Note: Once you master the “half-step” bend try a “full-step” bend which requires that you bend the note up TWO frets.
The vast abundance of guitar material on the Web is both exciting and daunting. Exciting, because you have all this information at your disposal. Daunting, because with so much information you will find yourself asking the question — Where do I start?
Guitar Lesson Lounge is as good of a place as any you’ll find on the World Wide Web. It’s not necessarily the greatest (if you can even define the “greatest guitar site”) or even the most prestigious, but what it may lack it makes up for with real, genuine content.
Let us explain further. The mission, as stated on their About page is ”to maintain a fusion of high quality and casual content” via a collection of college students who love music and the guitar as much as you do. This site literally contains no BS. If you continue to read their mission statement you will find that the creators of Guitar Lesson Lounge are not here for money, not here for fame, but rather to share their intense passion for the guitar.
Our goal here is to get you to feel what it’s like to just rock out and let go as you play an epic rock solo, or play that signature song. Because it’s the coolest feeling on earth. We want to inspire you to write songs, play in a band, make a career of it, just chill out and play for friends, impress that special person, who knows?!
If that does not give you goose bumps I’m not sure what will.
Guitar Lesson Lounge was created by Guillaume Devinat, who states on the site that having learned to play the guitar on the net, he too is looking to share that wonderful experience with others. Similar to GLC, Devinat has discovered the potential the Web could have on learning the guitar and he too is trying to educate, enlighten and inform through the future of the music learning process.
The site is still relatively new, less than a year old, and like previously mentioned — composed of mostly college students from around the world. Since it’s a “new generation” organized forum, the team wisely uses many of 21st centuries greatest educational resources such as video lessons, striking visuals and even a few extra daily tidbits via Twitter.
In fact, their strongest feature is the videos, some of which are offered free on YouTube. The videos are very crisp, clean and incredibly effective. It’s easy to follow along and just like any video, you can always pause or replay at a later date.
The only “catch” with Guitar Lesson Lounge is nothing valuable in this world is free and the site is no exception. They do reward registered members with four free lessons, including how to play “Knockin’ On Heaven’s Door” by Guns N’ Roses, “Reggae Nation Army” by The White Stripes and our personal favorite…”Superstition” by Stevie Wonder.
The rest of the lessons on the site, which range from Nirvana to Coldplay, Bob Marley to The Beatles, go for $8.97 a piece and include a difficulty rating prior to purchase. The price is very reasonable considering you’ll essentially know how to play some of the most popular songs in the world upon review and practice. Guitar Lesson Lounge even admirably pays royalties to the original artist and 5% of all profits go to the Playing For Change Foundation.
Check it out!
If you register with Guitar Lesson Lounge, the creators of the site are kind enough to give you four FREE lessons.
The very thought of restringing your guitar alone can make some people fret (again, no pun intended), however the process is much easier than you may have previously concluded.
There are, before we get started, a couple myths related to restringing your guitar:
You don’t have to do it often
It’s very difficult and best left in the hands of professionals
You should restring your guitar often (especially if you play a lot) to preserve that pure sound, although there are a couple of steps you can take to increase longevity. Also, it’s a practice that you can do without the aide of a local guitar shop, instructor, etc.
So, before we begin, you must first tell yourself, ‘I can restring my guitar.’ If you still do not believe it, than say it again and again.
Annoyed? Good, now let’s get rolling…
The first thing you must consider when it comes to new strings for the guitar is the size. Just as a size nine foot will not fit well in a size 13 shoe, a particular size string may not “fit” with your guitar and style of music.
Consider this: What tune do you regularly play in? The lower the tuning = the heavier the gauge. The higher the tuning, and you guessed it, the lighter the gauge. Selecting a gauge appropriate to your music will keep your strings consistently tight and avoid too much fret buzz.
Once you select a gauge, you must either own or borrow a string winder (manual or automatic), wire cutters, and a bridge pin puller if you have an acoustic guitar. NEVER attempt to restring a guitar merely by hand. It’s a waste of your time.
Once you have the new strings with appropriate gauge and tools, it’s time to get dirty. First, remove the old strings. The first step, as in most cases, is really straightforward and easy. All you need to do is unwind the strings until they flop off.
Note: A bridge pin puller is needed for this step if you are working with an acoustic guitar.
Once the old strings are off, it’s out with the old and in with the new. Open the package and begin with the lowest string (low E). You’ll want to work low to high because tonally it makes much more sense.
Start by placing the first string through the bridge hole. If you are re-stringing an acoustic, place the strings anchor in the bridge hole and then place the bridge pin after it. Make sure you keep the string tight so the bridge pin stays in place.
Next, bring the strings end up through the hole in the tuning peg and pull it until there is enough slack to wind the string about three to five times around the peg. The string should now be nice and tight and perform something of a relevant tone. Use the wire cutters to trim off the excess and repeat the process for the remaining strings.
Once you finish with the high E string, it’s time to move to the last step in the process. Please note that this step is important as it will prevent any premature snapping.
Loosely tune the guitar so you know how tight your strings are going to be. Once again, beginning with the low E string, place your left hand over the first few frets as if you were muting the strings. Use your right hand to pull gently upward close to your left hand.
Repeat this moving up the fretboard as you double check to make sure the string is nice and stretched out. You will than notice that the string you just tuned is way more flat sounding. Tune this string again and it should be able to hold its tune for a much longer period of time. Continue this process for the remaining strings.
As you have probably discovered while reading this post, restringing a guitar is fairly straightforward and a rather mindless activity. Remember, work low to high and place emphasis on the final step to ensure quality and longevity.
Jazz has long at the epicenter of American music. It originated at the beginning of the 20th century in African American communities in the Southern United States from a confluence of African and European music traditions.
According to A New History of Jazz by Alyn Shipton, from its early development until the present, jazz has incorporated music from 19th and 20th century American popular music. Its West African pedigree is evident in its use of blue notes, improvisation, polyrhythms, syncopation, and the swung note.
However, Art Blakey has been quoted as saying, “No America, no jazz. I’ve seen people try to connect it to other countries, for instance to Africa, but it doesn’t have a damn thing to do with Africa.”
Regardless of what you connect as the origins of jazz, you will, no doubt, also attribute its impact on a variety of other sub-genres. From big-band in the 30s and 40s to bebop, Latin, funk, and hip- hop – jazz has left an impression.
Naturally, it is then acceptable to see why so many aspiring guitarists want to learn jazz. This is especially true of people who have a deep rooted appreciation of music and belove the improv nature of this amazing genre.
Every guitarist has his or her own style. Some are very traditional, like true “modern rock” or “metal” guitarists, while others find one style they like and add bits of influence from many other genres into their music.
That’s the beauty of music. There is no limitation.
If you would like to make jazz your style, than you must first understand the basics, theory, and common practices of this special genre.
The jazz guitar can be a tough style to learn because it has a very distinctive sound to it. Whereas rock guitar and other styles utilize reverb and distortion to alter the sound of the instrument, jazz guitar is renown for its smooth sound. Thus, you must be able to hear the strings, not gain or distortion.
Improvisation, as previously mentioned, is not only a trademark but key element of jazz guitar. Improvisation is of course, a difficult skill and one of the few that is very hard to teach. For example, the most famous jazz guitarists such as Charlie Christian, Grant Green, Wes Montgomery, Pat Martino, and George Benson were already blessed with a natural ear for improv.
Improvisation is much more of a natural talent or skill than it is something you can acquire, however it is possible to heighten your senses to it by having an advanced understanding of scales, chords, and keys. These three elements are absolutely essential, as the leader of a jazz band will often call out a different key on the fly and expect everyone else in the group to immediately follow suit.
Learning different types of chords and scales is absolutely crucial. Chords like sustained chords and augmented fifths are simply regular chords with a note or two added and are great places to start with the jazz guitar. Also, individuals should practice scales beyond the regular pentatonic and chromatic scales to increase versatility.
At first glance, mastering the jazz guitar may appear a daunting feat and rest assured, it is a large challenge. However, it’s not impossible and with an advanced understanding and focus on chords, scales, keys, and improvisation, you too could become the next great jazz musician.
The majority of artists throughly believe that their own instrument is an essential element of the music experience. The “one size fits all” mentality does not exist in the musical world. We’ll leave that to baseball caps.
Rather, the musical instrument you play is completely central to you – the artist. Aside from the artist’s need to have a guitar that feels suitable within their hands, the instrument must also communicate the correct mindset of one’s music. The challenge, thus becomes for the musician to transform what appears to be a guitar, like any other guitar, into one that complements the distinctive style and reflective tone of the artist.
Keep in mind that the ideology of a “customizable guitar neck” is more appropriate for the moderate to advanced player. Most standard guitar necks are adequate for the typical guitarist. However, when those same guitarists begin to advance either in interest or skill, some desire for a more custom-made piece.
Customizing the guitar neck is popular among guitarists largely due to the fact that it’s rather easy to accomplish and several different varieties exist.
Among the most popular and easiest is to merely switch out a neck plate. The World Wide Web is filled with a nearly endless supply of neck plates, which when combined with your local music shop, is likely to have something for you. Yet if the abundance of guitar plates available on the Internet is still not enough, a few will opt to completely customize their plate from a specialty store.
Note: A few guitarists, especially those with famous vintage guitars, are frequently blessed with an already distinctive and recognizable guitar neck plate.
If you really have an artistic side, some will take the customizable approach a step further by manually painting the guitar neck. This is a very rewarding experience, especially if you do the procedure right. Should you be experienced, prepared, and confident enough to carry out this task, consult the proper ways to paint the guitar neck. In any event, the musician must be certain that the proper kind of finish is utilized on the guitar, in order to preserve the correct tone.
If you still do not feel comfortable with the whole “I’ll just paint it myself concept,” several guitar shops will be willing to carry out your “dream project.” Stop by your local music shop when you get a chance and ask about what they will do for “custom guitar neck creations.”
You will find that most, if not all guitar shops, will offer some type of guitar customization and should have plenty of terrific ideas for the guitar neck specifically. Provide them with the exact theme or details you want. Maybe you’re favorite band is The Rolling Stones and the shop could find a way to incorporate their famous tongue logo onto the neck?
The options are literally endless.
So if you have a birthday (or even Christmas) coming up soon, why not splurge a little and treat yourself to a brand new look? The beauty of guitars, perhaps more than any other instrument, is the numerous ways they are designed, constructed, painted, and even bruised through the years of playing.
Did you know an artist will make 95% of his or her revenue on stage?
The importance of a fantastic stage presence is vital to say the least. Yet, according to Alex Boye of Expert Village, the “talent” is often overlooked.
Before we get too detailed, one may ask, ‘What really is your stage presence?’
Good question.
One source defines your stage presence as “a performance skill—a quality defined by a performer’s ability to command the audience’s attention through projection, focus, attention, expression, confidence, and so on.”
Note the emphasis on “command.” A great entertainer will command the audience’s attention and thus win over their hearts. Consequently, the goal of this article is to learn how to command the audience. You do that and you’ll be fine.
Confidence. As Alex Boye said it, is extremely important. If you have it, you can “get away with a multitude of sins.” If you lack it, you’ll be lucky to survive before getting booed off stage.
Now, this may sound really easy but anyone who has been on stage before will beg to differ. When you are in the spotlight, in front of hundreds (if not thousands) of fans, your legs will begin to shake and your heart will feel like it’s about to pound out of your chest. This is common. It’s natural.
Everyone has nerves before they take the stage. Some may be more “natural” at having a great stage presence but nobody is perfect. Some of the world’s greatest performers will even tell you that a few butterflies before a show is a good thing. So do not run away from your nerves but embrace them.
My college speech teacher told me that you may “feel like crap” when you’re performing in front of others, but how you feel rarely translates to how you actually look. That is why so many speech classes in high school or college will tape the speech. It’s highly likely that the student will feel like they did a horrible job, but once they see the performance, they will agree that it actually was not as bad it may have initially appeared.
Stage presence is actually an acquired skill that will improve with practice. Unfortunately, not everyone in the world has access to the city’s venue each week with thousands of fans. Thus, one must practice alone in front of such bizarre “audiences” as a mirror. You may look silly, but you can learn a lot by practicing in front of a mirror.
If you are a guitarist, it’s highly likely that you perform with a band. Sharing the stage with others may take some of the individual pressure off of yourself. However, the guitarist and singer (or singer/guitarist) are two of the most important positions in a band. Fans really dig the singer and they really dig the guitarist. Consequently, you must find an individualistic stage presence while matching with that of the band.
You need to command the audience, elude confidence, and without a doubt play good music – but one thing you no not want to do is act like a phony. You can spot a phony from a mile away. They try to “over do it.” Some may say, on the other hand, that a great stage presence is 100% natural and derives from playing music that you love and are passionate about. So just be natural. It makes for a great debate.
I believe it’s somewhere in between. A great live band has a stage presence that is both natural and well rehearsed. They know when to “stick to the script” and when to improvise.
Aspiring guitarists and bands can learn a lot from some of the greatest live bands of all-time. AskMen.com recently put together a top ten list and the number one spot belonged to Queen. As the web site accurately put it:
“Simply one of the greatest performers of all time, Freddie Mercury’s passion and theatrics could not be matched when he was up on stage. Singing himself beet-red in the face and acting out every lyric as if his life depended on it, seeing Mercury perform was a revelation.”
Spin.com begged to differ and placed U2 at the number one spot. Regardless, you can learn several tricks from many of the artists on these lists.
The guitar is truly a beautiful instrument. Not only does it sound amazing, but the appearance is nearly as sacred. However, the beauty of the guitar does not come easy. Guitars take money, resources, and time to build. Yet, hundreds if not thousands of individual parties complete this task each year.
If you have ever had the itch to build your own custom guitar, the point of today’s post is to give you a little background into what you will need and what it will take to accomplish this feat.
Tools
For a fantastic video demonstration of the tools you’ll need to build a guitar, check out the video below…
Types of Wood
Now that you have a solid understanding of the tools you’ll need; the next step is to select a type of wood. The most important part of building a fine instrument is the material, and for the guitar, that material is the wood. The finest guitars are made from solid pieces of some of the best pieces of wood in the world. Cheap guitars are built from laminate woods, or plywood covered with a laminate wood veneer. A quality instrument is always built from only the finest solid woods such as:
Brazilian Rosewood
Brazilian Rosewood, like the name implies, derives from trees that grow in the forests of Brazil. Because of deforestation and overexploitation, the wood has now became illegal to ship outside of the United States. Due to its rarity and terrific acoustical properties, Brazilian Rosewood is one of the most coveted materials for the back and sides of a fine guitar.
Hawaiian Koa
Hawaiian Koa is a beautiful golden brown wood that has long been considered a prized wood. Natives often made canoes and furniture from the Koa, however guitar enthusiasts seek the wood for another reason. Hawaiian Koa provides a very warm and rich sound, making it ideal for acoustic performances. Unfortunately, just like the Brazilian Rosewood, Hawaiian Koa is really rare and hard to purchase.
Bubinga
Bubinga is an African wood (often called African rosewood) and another prized material for fine guitars. Bubinga is available in a variety of colors including reddish hues, reddish-brown hues, and even a brownish violet hue. Bubinga is also used in other instruments such as harps, basses, and even drums. The wood provides a mellow, dense, and well-rounded tone for a guitar.
Design & Planning
You must understand a few important rules to building guitars before you can design the guitar. The first and most important is the scale length. The scale length “is the length the string travels between the nut at the top of the fretboard and the bridge at the mid section of the base of the guitar.” In order to determine the scale length of your guitar, the individual must measure from the front part of the nut (where it meets the fretboard) to the center of the 12th fret on the neck. Then, the individual must multiply that length by two. For more information on this step, Click Here!
As with any major construction project, it’s always best to pre-plan your design concept in order to ensure that some mistakes are avoided later in the construction phase.
Ready for More…
If constructing your very own custom guitar is something that you’ve always wanted to do and the above information did not steer you away – what is stopping you from creating your very own guitar?
Instructables has a very informative piece on building your own guitar. The article breaks down the process into each step while providing additional information and diagrams. Click Here!
Also, Expert Village’s partnership with Frank Pope of FBI Guitars provides a very detailed account of the guitar construction process. Click Here!
We all take up the guitar with the idea that someday we can play our own music. At first, the guitar is broken down into its sheer basics. Then, we slowly progress into chords, “hammer-ons”, “pull-offs”, and all the other skills needed to play along with popular songs. However, you’re never a “true” guitarist until you can play your own material.
Welcome to songwriting and the guitar; your guide to not only making great music, but great music that highlights the guitar. Writing songs takes a lot of time and effort. It’s true that practice will make you better, however some people are just born with a “natural ear.” They know what sounds great and when to incorporate it into the song.
In terms of songwriting, too many people focus on the finished product before they take into account all the components of songwriting. In order to master the craft of songwriting (and it is a craft), one must first master the basics. The song is generally broken down into different sections or components. When these components are fused together, a song is born. Your job is to combine all of them into a single masterpiece.
I like to compare a good song to a shake. The banana may taste alright in itself, but when you blend it with some berries and cream; the end result is a fantastic tasting combination. Thus, you may have a talent for writing lyrics, but the lack of a good sound will dull out the content. Here are the basics components of songwriting:
The first section of the song that the listener will hear is called the verse. The verse is the heart of the song, because it informs the listener what the song is about. A talented songwriter has the knack for creating a captivating sound along with imagery and details contained in the lyrics. The verse usually keeps a very natural and steady melodic flow, thus allowing the listener to connect with the lyrics.
The verse generally leads into a bridge and/or chorus. Some songwriters also refer to this part of the song as the “hook.” The chorus is the emotional high point of the song. The chorus is often repeatedly three to four times throughout the song, so it’s often very catchy and easy to sing along with. The chorus sums up the entire theme of the song. The chorus also differs melodically than from that of the verse. The main focus for the melody of the chorus is to create a bit of contrast between the verse and the chorus. This will give the listeners something to look forward too, but also will give them a sense of tension and release.
Songwriters love to mix the guitar into both the verse and chorus. Sometimes the guitar merely serves as a rhythmic backbone, while other times the guitar leads all the other instruments in the melody. The power of the guitar is also effected by the genre in which you play - as it will take much more precedence in metal/rock, when compared to country for example. Metal and Rock are renown for the guitar solo. Is is here where the guitar really takes off into an independent journey which represents both creativity and skill.
If you really want to become a master songwriter on the guitar, one should learn from the experts. Dial into your local radio station and listen to what’s hot. Songs are played over and over again on the radio because they are hits. Why are they hits? Because the songwriting is phenomenal and has the ability to connect with the audience. Aspiring songwriters should also reference music theory and the basics in order to gain a true understanding and appreciation for music. Also, Ultimate-Songwriting is a terrific one-stop reference.
The 12 bar blues in the most basic form aren’t difficult. Sure some of the great blues guitar players use a lot of technique, but in the basic form any beginner can understand the theory behind it. In this beginner lesson I’m going to show you how to find the chords that go into making up a 12 bar blues progression, the pattern and way to play those chords and also a couple of tips on where to find the chords on the neck.
So before you can start playing anything you need to know what chords you’re going to be putting together. Since the 12 bar blues is a simple pattern you can learn it’s easy for you to determine what chords you must play in a given key.
You need to find the first, fourth and fifth notes that are in the scale for the given key you want to play in. If you know your scales well then this won’t be a problem, if you’re a little rusty on this no problem the net has all the resources you need. The first note is just that the first note in the scale and so on each note counts up one as you go down the line.
Once you’ve figured out which notes are what number and you’ve chosen the first, fourth and fifth notes we can plug those in as chords in the following 12 bar blues pattern:
1 – 1 – 1 – 1 – 4 – 4 – 1 – 1 – 5 – 4 – 1 – 5
The 12 bar blues always follows this same pattern above. The numbers of course correspond to chords that we find in the first part of the article. Each number stands for one measure, and there are 12 in all making it the 12 bar blues. The length of a measure could vary, if we assume we’re playing 4 beats per measure then we’d give each chord 4 beats for each bar.
Let’s look at a short example of how to piece together a 12 bar blues progression in the key of A.
We need to first start with the A major scale. The scale looks like this:
A – B – C# – D – E – F# – G# – A
Picking out the first, fourth and fifth notes gives us A, D and E respectively. Next we add those to the 12 bar blues pattern we learned above, and it provides us with a progression that looks like this:
A – A – A – A – D – D – A – A – E – D – A – E
Finally take a few minutes to watch the lesson video below. I walk you through the 12 bar blues in the Key of A and show you where on the neck to play these chords and what feel you should give your playing. Once you’ve finished that I urge you to go grab your own guitar and give it a try.
Want to sharpen you guitar skills? How you ever considered self study at home using a guitar instructional dvd? DVD instruction gives you the one-on-one feel of private lessons but you’re in control of when you learn and how fast you study.
When we start to learn guitar the thing on our minds is almost always chords. We want to learn to play songs that we know and we know that learning to play chords is what will get us there.
Today I’m going share with you some beginner guitar chords you can learn quickly. All three of these chords are three string chords, meaning they only require you to strum 3 strings and that’s it. So lets get going.
C Chord
E — 0 —
B — 1 —
G — 0 —
D — X —
A — X —
E — X —
A quick note about what the guitar tab means above. The X’s mean you do not strum that string, the 0′s mean to play that string open and a number refers to a particular fret that you press when strumming the 3 strings.
For this three string C chord you are pressing down on the first fret on the B string and playing the G and E strings open.
G Chord
E — 3 —
B — 0 —
G — 0 —
D — X —
A — X —
E — X —
To play the three string G chord you play the G and B strings open and the 3rd fret on the high E string.
D7 Chord
You will find the D7 chord a bit more challenging then the G and C chords we covered first. Why? Because you have to press on a fret on the three bottom strings at once.
E — 1 —
B — 2 —
G — 1 —
D — X —
A — X —
E — X —
For the D7 chord you must place your second finger on the 1st fret of the E string, your third finger on the 2nd fret of the B string and your first finger on the 1st fret of the G string.
This will feel uncomfortable at first but focus on using the tips of your fingers and keeping your thumb on the back of the neck. I give more explanation in the video below.
After watching the video below grab your guitar and give these three chords a try. Don’t get discouraged if at first you find it difficult, also don’t try to immediately switch between them while strumming. Before you trying strumming them and switching between chords ensure you can easily make the shape and strum the chord on it’s own.
To learn more beginner guitar chords fast why not try a learn to play guitar dvd? Self study dvd courses teach you beginner guitar skills at your own pace from the comfort of your own home.


 http://www.youtube.com/watch?v=bP2REjVaxZg/0.jpg" alt="YouTube Preview Image" />